
· By Angie Mok
How to unlock your first back lever?
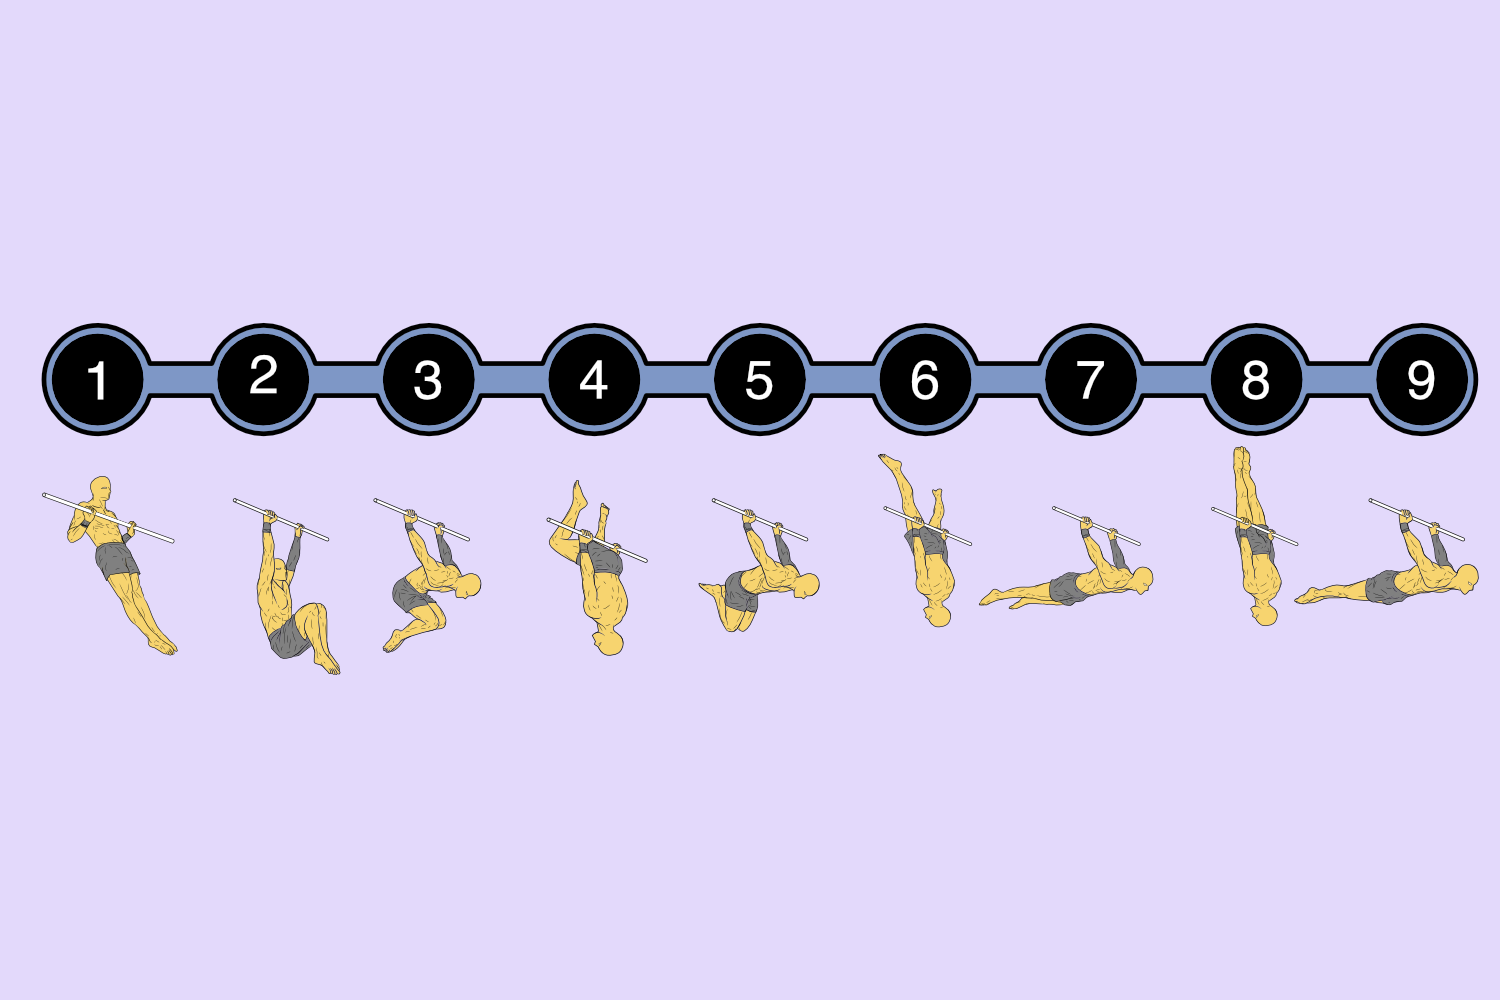
Step-by-step progression: From one pull-up to a full back lever
Discover how to develop strength, control, and body awareness.
Following all steps in order leads to mastering the back lever
Table of contents
Can you do pull-ups? Step one: Hit 10 clean pull-ups Step two: Nailed 5 smooth skin the cats Step three: 15-20 second hold of tucked back lever Step four: 8 smooth straddle transitions Step five: 10-15 second hold of advanced tucked back lever Step six: 6 slow straddle negatives Step seven: 10-second hold of straddle back lever Step eight: 5 full back lever negatives Step nine: Full back lever 9 steps to unlock back lever
Can you do pull-ups?
If you can do just one pull-up, you already have the foundation to master the back lever, one of the most impressive bodyweight skills in calisthenics. Follow the sequence without skipping steps and you’ll unlock the full back lever.
Grab a pull-up bar and get ready to turn your single pull-up into an advanced calisthenics skill that truly defies gravity.
If you can't do a pull-up yet, read this blog.

If you’re serious about building basic calisthenics skills, check out our Calisthenics Playbook. It’s a detailed guide that covers the three core movements every athlete should master pull-ups, push-ups, and squats along with progressions for all levels.It gives you a clear roadmap to follow without the guesswork.
Step one: Hit 10 clean pull-ups
Begin with a grip slightly closer than shoulder-width apart and focus on controlled movement. Pulling your chin over the bar and lowering with stability, keeping your body straight without swinging or kipping. Aim for 10 perfect pull-ups, emphasizing form over speed or momentum. This consistent grip and strict technique will build the strength, shoulder mobility, and body control you’ll need for advanced calisthenics skills. Once you can perform 10 clean reps confidently, you’re ready to progress to the next step: skin the cat.

Step two: Nailed 5 smooth skin the cats
Next comes skin the cat, a key calisthenics move that builds the shoulder mobility and control needed for the back lever.
Using the same grip as your pull-ups, hang from the bar with straight arms, bring your knees to your chest, and roll backward through your arms until you pass under the bar, then smoothly return to the start. Keep your body tightly tucked and your arms locked straight throughout the movement. This exercise feels like a backward somersault while hanging and powerfully strengthens your shoulders and core. Aim for 5 smooth, controlled reps, even partial reps count as progress. Once you’ve mastered 5 clean skin the cats, you’re ready to move on to the next step: the tucked back lever.

Step three: 15-20 second hold of tucked back lever
Now it’s time for your first real back lever hold, the tucked back lever. From the skin the cat position, hold your body horizontally under the bar with your knees tucked tightly to your chest and your arms straight. Keep your core fully engaged and resist letting your hips drop to maintain a compact, controlled shape. Expect serious tension in your elbows, lats, and core that burn means you’re doing it right. Aim to hold this position for 15–20 seconds, focusing on stability and form over duration. Once you can sustain a solid tucked hold, you’re ready to progress to the next stage: straddle leg movements.

Step four: 8 smooth straddle transitions
Next, you’ll progress to straddle leg movements, the bridge between the tucked back lever and advanced variations. Starting from your tucked back lever, slowly extend your legs outward into a wide straddle, holding that position briefly before returning to the tuck. Focus on smooth, controlled movement both ways, keeping your body horizontal and your hips from dropping. This exercise challenges your core stability and shoulder strength as your legs shift in and out. Aim for 8 clean transitions, maintaining perfect control throughout. Once you can complete all 8 reps with stability and precision, you’re ready to move on to the advanced tuck position.

Step five: 10-15 second hold of advanced tucked back lever
The advanced tuck back lever takes your strength and control to the next level. It’s similar to the basic tuck, but instead of curling your knees tightly to your chest, you extend them to about a 90-degree angle, creating a longer, more challenging position. This increased leverage forces your core, shoulders, and lats to work much harder to maintain stability. Keep your core tight and your body aligned throughout the hold, your abs will feel the intensity of this isometric challenge. Aim for a 10–15 second hold with clean form and no hip sag. Once you’ve mastered the advanced tuck, you’re ready to move into straddle negatives, where you’ll start learning how to control your descent into the full back lever.

Step six: 6 slow straddle negatives
Now it’s time to build real control with straddle back lever negatives. Begin from your tucked position and slowly extend your legs into a wide straddle while lowering your body toward the horizontal back lever position. The key is to move as slowly as possible. Take at least five seconds to descend, keeping your body straight and your core fully engaged the entire time. This phase develops the strength, shoulder stability, and body awareness needed for the full back lever. After reaching the bottom, return to the tuck or drop down to reset before your next rep. Aim for 6 controlled negatives, each lasting over five seconds. Once you’ve mastered these, you’re ready to attempt holding the straddle back lever itself.

Step seven: 10-second hold of straddle back lever
Now it’s time for the straddle back lever hold, your first real taste of the full position. From the straddle negative, hold your body perfectly horizontal with your legs wide, arms locked out, and core tight. Every muscle in your posterior chain from your shoulders to your glutes, works together to keep you flat and stable. Avoid letting your hips drop or your shoulders roll forward to maintain proper alignment. This move demands immense tension and control, and even a 10-second hold will test your limits. Once you can sustain that solid 10-second straddle back lever, you’re strong enough to progress to the next phase: full back lever negatives.

Step eight: 5 full back lever negatives
The full back lever negative is your final strength test before achieving the complete move. Begin from your straddle position and slowly bring your legs together into a perfectly straight line, lowering your body under control until you reach a full horizontal back lever. This is the most demanding negative yet, requiring total body tension, shoulder stability, and precision as you fight gravity every inch of the way. Keep your form tight. No arching, no sagging and focus on smooth, deliberate movement. Aim for 5 controlled negatives full back lever, taking your time on each descent. Once you’ve completed all five with solid control, you’re ready for the ultimate goal: holding the full back lever.

Step nine: Full back lever
This is the moment you’ve been building toward the full back lever. From a hanging position, transition smoothly into a perfectly straight, horizontal line with your legs together and arms fully extended. In this gravity-defying position, your entire body is working in harmony: your lats pull, your core braces, and your glutes fire to keep you stable. The technique mirrors your negatives, but now you’re holding the position with full control instead of lowering through it. Even a one- or two-second hold counts as success, it proves you’ve developed the strength, balance, and body awareness required for one of the most advanced calisthenics skills out there. You’ve officially achieved the full back lever, a move that showcases pure power and precision.

9 steps to unlock back lever

If you struggle or lose form at any step, don’t push through. Simply go back to the previous progression, rebuild your control, and then move forward again.
- 10 clean pull-ups with proper grip
- 5 reps of skin the cat
- 15-20s hold of tucked back lever
- 8 reps straddle transitions
- 10-15s of advanced tuck back lever
- 6 slow reps of straddle negatives
- 10s of straddle hold
- 5 reps of pull back lever negatives
- Full back lever
Yellow Dude Team
Yellow Dude teaches people how to get strong using their body weight. His style is simple - anyone can follow along and learn.
You can spot him by his yellow skin, fit body, and perfect form. He helps people learn bodyweight exercises, from basic moves to hard skills.
When he's not showing proper workout form, he makes funny memes about training and gets people excited about calisthenics.


